


Transfer Data To iPhone 16 Pro
Upgrading to a new iPhone should feel simple and secure. This guide explains each step to move your data from an old iPhone to an iPhone 16 Pro. It covers the main methods Apple supports, common checks to do before you begin, and how to confirm everything transferred correctly.
- Transfer Data To iPhone 16 Pro
- Before you start: checklist and quick preparations
- Method 1 – Quick Start wireless transfer (device to device)
- Method 2 – Quick Start with a cable (faster, more reliable)
- Method 3 – Restore from iCloud backup
- Method 4 – Restore from a local backup on Mac or Windows
- How to transfer Messages, iMessage and SMS
- Apps, media and app-specific backups
- After the transfer – verify and tidy up
Follow the method that suits you best. The options are device-to-device Quick Start, iCloud backup and restore, and a Mac or Windows computer backup and restore. Each method includes clear steps, tips for preserving passwords and health data, and troubleshooting advice.
Before you start: checklist and quick preparations
Prepare both iPhones and your accounts before the transfer. First, update the old iPhone and the new iPhone 16 Pro to the latest available iOS version if possible. Updated software reduces the risk of errors and helps ensure compatibility during the transfer process.
Charge both devices to at least 50 percent and keep them connected to power during transfer. If you plan a wireless transfer, place the phones close together on a flat surface. If you will use a wired method, have the necessary cable and any adapters ready. Also sign in to your Apple ID on the old phone and make sure you know the Apple ID password.
Back up important data manually if you want an extra safety copy. You can create an iCloud backup or a local encrypted backup on a Mac or Windows PC. Encrypted backups are important if you want to transfer saved passwords, Wi Fi settings, and Health data. Confirm that iCloud storage has enough space if you plan to use iCloud backup.
Method 1 – Quick Start wireless transfer (device to device)
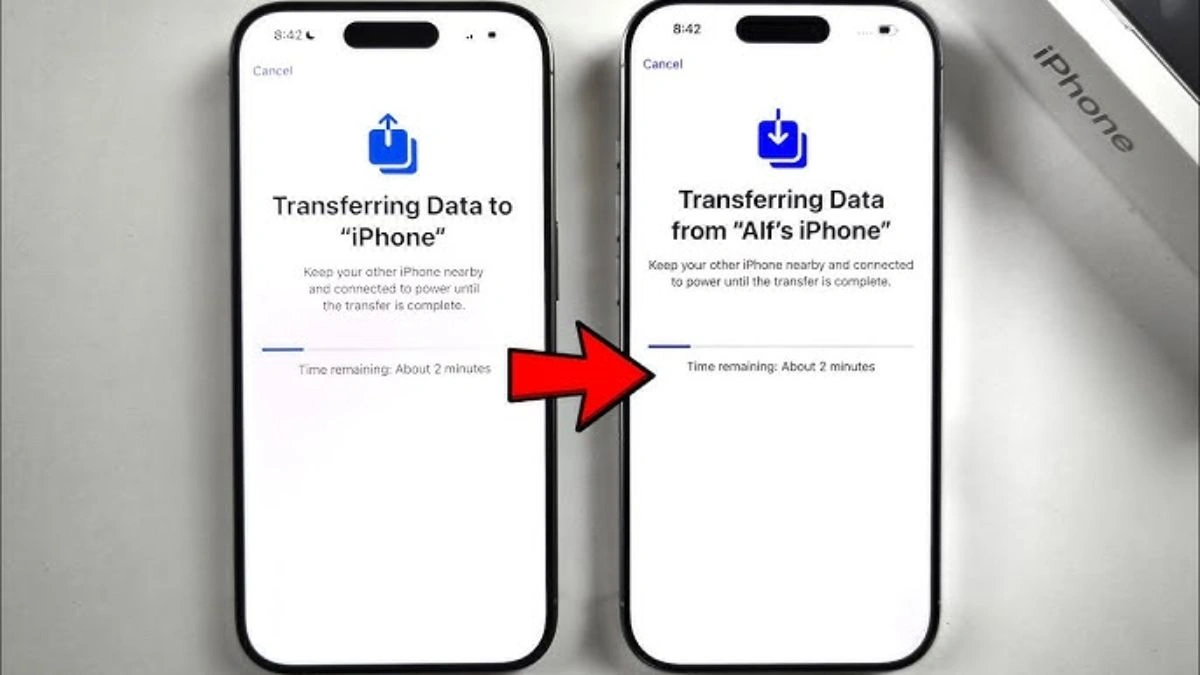
Quick Start is Apple’s easiest wireless method when both devices run compatible iOS versions. Turn on your new iPhone 16 Pro and place it near your old iPhone. The old iPhone will show a Quick Start screen offering to set up the new device using your Apple ID.
Tap Continue on the old iPhone and follow the on-screen prompts. An animation appears on the iPhone 16 Pro that you scan with the camera of your old iPhone. When the devices connect, you will be asked to enter the old iPhone passcode on the new device and to set up Face ID or Touch ID on the iPhone 16 Pro.
Choose Transfer from iPhone when prompted. The phones will copy data, settings, and apps directly. This can take from several minutes to a few hours depending on how much data you have. Keep both devices on power and close together until the process finishes. After transfer, the iPhone 16 Pro will download app updates and content from the App Store and iCloud.
Method 2 – Quick Start with a cable (faster, more reliable)
If you prefer a wired transfer, connect the two iPhones using a compatible cable and any required adapter. A wired connection is often faster and more reliable, especially when you have a large amount of data or slow Wi Fi.
After physically connecting the phones, turn on the iPhone 16 Pro and follow the Quick Start instructions. You will still authenticate with your Apple ID and enter the passcode from the old phone. Select Transfer from iPhone and allow the wired transfer to run. Keep the cable connected and both devices charged until the process completes.
A wired transfer will still restore apps and content from the App Store or iCloud as needed, but the direct connection moves much of your data faster. If you transfer an encrypted local backup using a computer later, you can also use it to bring across saved passwords and Health data.
Method 3 – Restore from iCloud backup
If you prefer to set up the iPhone 16 Pro from an iCloud backup, first make a fresh backup on the old iPhone. On the old iPhone go to Settings, tap your name, then iCloud, then iCloud Backup, and choose Back Up Now. Wait until the backup completes.
Turn on the iPhone 16 Pro and follow the setup screens. When you reach the Apps & Data screen, choose Restore from iCloud Backup. Sign in with your Apple ID and pick the most recent backup. The restore process downloads your settings, app data, photos, and other content from iCloud to the new device.
Large backups can take time to download. Use a stable Wi Fi connection and keep the iPhone 16 Pro plugged in. After the restore, apps will continue to download in the background and the device may need a short time to recompile mailboxes, messages, and photo thumbnails.
Method 4 – Restore from a local backup on Mac or Windows
Use a Mac or Windows PC when you prefer a local encrypted backup. Connect the old iPhone to your computer. On macOS, open Finder and select the device. On Windows or older macOS versions, open iTunes. In the backup settings choose Encrypt local backup and create a backup now. Remember the backup password you set because you will need it to restore passwords and Health data.
After the backup completes, connect the iPhone 16 Pro to the same computer. In Finder or iTunes choose Restore Backup and select the encrypted backup you just made. Enter the backup password when prompted. The restore transfers data from the computer to the iPhone 16 Pro.
A local encrypted restore normally moves app data, messages, saved passwords, and Health data in one pass. The iPhone may still fetch app binaries from the App Store after the restore, so keep it connected to Wi Fi to finish downloads.
How to transfer Messages, iMessage and SMS
Messages stored in iCloud sync automatically if you use Messages in iCloud. To use Messages in iCloud, on the old iPhone open Settings, tap your name, choose iCloud, and enable Messages. When enabled, message history is available across devices signed into the same Apple ID.
If you do not use Messages in iCloud, the transfer methods above will still move messages depending on the backup type. An iCloud backup or an encrypted local backup includes your SMS and iMessage history. Quick Start and direct device transfers also migrate messages during the setup process. Verify message history after transfer by opening Messages on the iPhone 16 Pro and scrolling through conversations.
Apps, media and app-specific backups
Most apps will restore during the transfer or from iCloud after you finish setup. Large media files and app caches may take longer to download. For special app data such as WhatsApp chats, follow the app developer’s recommended backup and restore steps. For WhatsApp, for example, you would back up chats to iCloud from the old device and restore them on the new device after installing WhatsApp on the iPhone 16 Pro.
Photos synced with iCloud Photos appear automatically after signing into your Apple ID and enabling iCloud Photos. If your photos are stored only on the old iPhone and not in iCloud, ensure they are included in the backup you choose. Check in Settings, Photos to confirm iCloud Photos is on if you rely on cloud sync.
After the transfer – verify and tidy up

When the transfer completes, confirm that key data moved correctly. Check Contacts, Photos, Messages, Calendar entries, and email accounts. Open a selection of apps to ensure their contents restored and sign in to apps that require a separate login.
If you use two-factor authentication, be ready to approve sign-ins for services that detect a new device. Check Wallet and Apple Pay, you may need to re-add cards for security reasons. Review Apple Health for step counts and other synced data, and confirm that saved passwords and Wi Fi networks are present if you used an encrypted backup.
Remove the old iPhone from your Apple ID if you plan to sell or recycle it. On the old device go to Settings, tap your name, scroll to the device list, select the old iPhone, and choose Remove from Account. Then erase the old device in Settings, General, Transfer or Reset, Erase All Content and Settings.
Also Read- Top Mobile Phone Plan Providers In Australia (2025)